To switch your Unity project to Android, you need to configure Unity to build your project for the Android platform. This involves changing the target platform and making sure that the required Android SDK, NDK, and JDK are properly set up. Here’s a step-by-step guide to switch Unity to Android:
1. Install Unity with Android Build Support
First, ensure that you have the Android build support installed in Unity. If you haven’t installed it yet, follow these steps:
- Open the Unity Hub.
- Select your Unity version and click on the three dots next to it.
- Choose Add Modules.
- In the list of modules, make sure Android Build Support is selected (this includes Android SDK & NDK Tools, and OpenJDK).
- Click Done to install the required modules.
2. Switch to Android Platform
Once Unity and the required Android modules are installed, follow these steps to switch your project to the Android platform:
- Open your Unity Project.
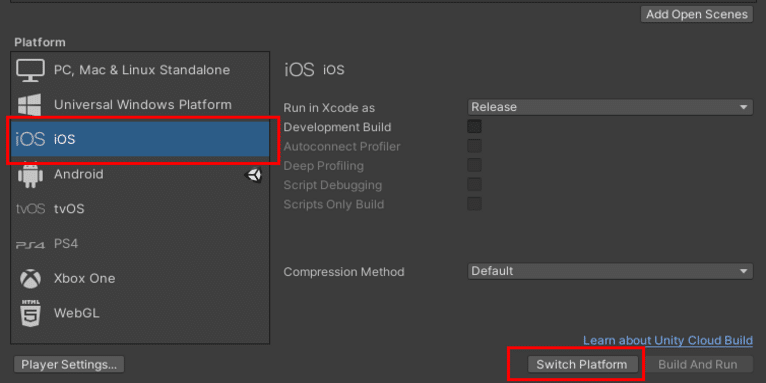
- Go to File > Build Settings.
- In the Build Settings window, you will see a list of platforms on the left.
- Select Android from the list.
- Click the Switch Platform button in the bottom-right corner of the window.Unity will take a few moments to switch the project to the Android platform, re-import assets, and make any necessary adjustments for Android compatibility.

3. Configure Android Settings
After switching the platform, you need to configure some settings specific to Android:
a. Player Settings
- In the Build Settings window, click on Player Settings (this will open the Inspector window with Android-specific settings).
- In the Inspector, under the Player section, you’ll find several tabs (like Resolution and Presentation, Other Settings, Publishing Settings, etc.).
- Company Name and Product Name: Set the company and product name, as this will be used in your app’s metadata.
- Package Name: This should be in the format
com.companyname.appname(e.g.,com.mygame.example). - Minimum API Level: Set the minimum Android version you want to support (you can set this to a lower version, depending on your target audience, but try not to use very old API levels).
- Target API Level: Usually, it’s best to set this to the latest available option for the best performance and compatibility.
b. Other Settings
- Graphics API: Android typically uses OpenGL or Vulkan, but Unity should automatically set this for you. You can change it under Other Settings > Graphics API if needed.
- Internet Access: If your app needs internet access, be sure to check the Internet Access setting under Other Settings (either Require or Auto).
c. Keystore (For Publishing)
To publish your app on Google Play, you’ll need to set up a keystore for signing your APK:
- Under Player Settings > Publishing Settings, click Keystore Manager.
- Create or select an existing keystore.
- Enter the Key Alias and Key Password to sign your app.
4. Install Android SDK, NDK, and JDK (if not done automatically)
Unity usually handles the installation of Android SDK, NDK, and JDK automatically when you install Android Build Support. However, if it’s not set up, you’ll need to configure them manually.
- Go to Edit > Preferences (on Windows) or Unity > Preferences (on macOS).
- In the External Tools section, check the paths for the Android SDK, Android NDK, and JDK.
- If these paths are empty, you can download and install the Android SDK and NDK manually, or use Unity’s built-in tools to download them automatically:
- For SDK and NDK, you can download them via the Unity Hub under the Installs tab for your Unity version.
- Alternatively, you can download them through Android Studio.
5. Build and Run on an Android Device
Once everything is set up, you can build and run your project on an Android device:
- Connect your Android device to your computer via USB and enable Developer Mode and USB Debugging on the Android device.
- In Unity, go to File > Build Settings.
- Make sure Android is selected, and click Build and Run.
- Unity will build the project and deploy it to the connected Android device.
6. Test and Debug Your Game
You can use the Console in Unity to view logs and debug messages during testing. Additionally, Android-specific errors can be viewed in Logcat (using Android Studio or other tools).
7. Build the APK or AAB for Release
For production, Unity allows you to generate an APK or Android App Bundle (AAB):
- Go to File > Build Settings.
- Click Build (to generate an APK) or Build App Bundle (to generate an AAB).
- Select the output directory and Unity will create the APK or AAB file, which you can upload to the Google Play Store.
Note:
Switching Unity project to Android app is a straight forward process that involves selecting the Android studio platform in Build Settings, configuring Android-specific options like the minimum android API level and signing keys, and ensuring the Android SDK, NDK, and JDK are properly set up. Once these steps are complete, you can build and deploy your Unity project to Android devices for testing or release.
Benefits of Using Coding Filters in Software Development!
Using coding filters brings numerous benefits to software development, such as improved code maintainability, easier debugging, and better performance. By isolating specific logic or conditions, developers can minimize the risk of errors and make their code more modular, readable, and adaptable to changes.


